Word 2003: Edit Tables

Lesson 20: Edit Tables

/en/word2003/working-with-tables/content/

Introduction

By the end of this lesson, you should be able to:

  • Edit tables

Editing tables

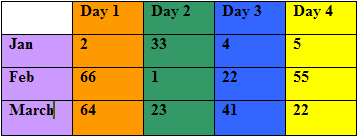
Once you have created your table, you may find that you need to format text within your table, insert or delete rows and columns, or perhaps just change the appearance of your table so it is more visually appealing.

Formatting text in tables
Fortunately, whatever you do to format text in a paragraph (make it bold green, for example), you can do to text in a table cell. Formatting text within a table can be accomplished through a variety of means, including the Formatting menu, the Tables and Borders toolbar, the task pane, and keyboard shortcuts.

Rotating text in tables
Many advertisements, for-sale signs, menus, and other creative documents use Word's text direction feature to change typical horizontal text to eye-catching vertical text. You can rotate text so it runs vertically, facing either the right or the left.

To rotate text in a table cell:

  • Select the cell(s) you want to rotate.
  • Click the Change Text Direction button Text Direction Button: on the Tables and Borders toolbar.
  • Clicking the Change Text Direction button once turns text to the vertically left, the second click turns text to vertically right, and the third click will bring your text back to a horizontal position.

Different Text Directions

CompleteThe insertion point rotates when entering vertical text, but editing vertical text is no different from editing horizontal text.

Inserting and deleting columns and rows

Estimating how many rows and columns you will need in a table is not always easy. Therefore, it is important to know how to insert and delete rows and columns in your existing table.

To add rows to your table:

  • Move the insertion point to the last cell in the table and press Tab.

To insert rows in the middle of the table:

  • Place the insertion point anywhere in the table.
  • Choose Table arrow Insert arrow Rows above OR Rows below.

To delete rows:

  • Select the row(s) you want to delete.
  • Choose Table arrow Delete arrow Rows.

OR

  • Right-click and choose Table arrow Delete arrow Rows from the shortcut menu.

To delete a single table cell:

  • Place the insertion point inside the cell you wish to delete.
  • Choose Table arrow Delete arrow Cells from the menu bar. The Delete Cells dialog box appears.
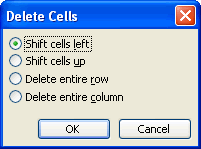
  • Click Shift cells left, Shift cells up, Delete entire row, or Delete entire column.

Delete Cells Dialog Box

To insert a column:

  • Position the mouse pointer where you want to column to be located.
  • Choose Table arrow Insert arrow Insert Columns to the Right or Insert Columns to the Left.
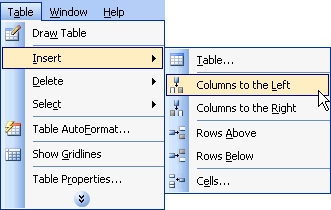
Insert Columns Menu

Resizing tables

You may need to adjust the size of columns, rows, and cells.
To adjust columns, rows, and cell size:

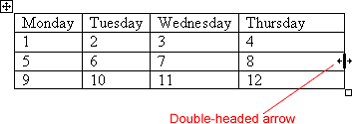
  • Hover the insertion point over any line in your table that borders the area you want to change.
  • The insertion point changes to a double-headed arrow.
  • Drag the border either left or right OR up and down.

Double Headed Arrow

CompleteTo automatically adjust the size, select the entire table and then choose Table arrow AutoFit arrow AutoFit to Contents.

AutoFormat
Just as Word offers document templates for memos, faxes, reports, and other items, it also offers templates for tables.
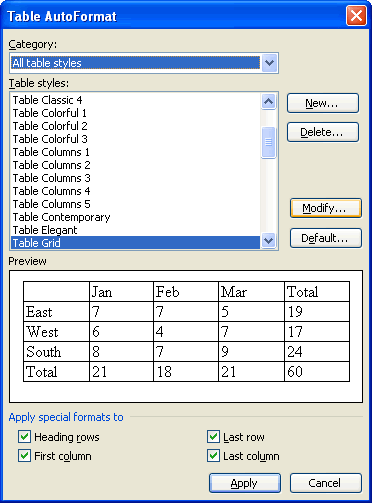
To use AutoFormat:

  • Create your table.
  • Click anywhere in the table. Go to the toolbar and select Table and then Table AutoFormat. The Table AutoFormat dialog box appears.
  • Scroll through the Table Styles until you find a table you like. You can preview each table style in the Preview box.
  • Check and uncheck the options in the Apply special Formats to: sections to slightly change parts of your table. Check out your changes using the Preview box.
  • Click the New button to customize your own table style.
  • Click the Modify button to change parts of an existing table style.
  • Click OK.

AutoFormat Dialog Box

Adding borders

Many of the tables in the AutoFormat dialog box use unique borders and shading options. To add these special features to your own table, you can use the Tables and Borders toolbar.
To change line style or line weight on an existing table:

  • Click the drop-down arrows (next to the buttons) to view and select from the list of choices.
  • The mouse pointer turns into a pencil Pencil Icon.
  • Trace the line(s) you want to change.
  • Click anywhere outside the table to change to pencil back into the I-beam.

To change the border color on an existing table:

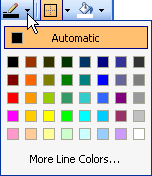
  • Click the drop-down arrow next to the Border Color button. A color menu appears.
  • Select a color. The I-beam becomes the pencil.
  • Using the pencil, trace the border(s) you want to color.

Border Colors

To apply a border:

  • Select the line style, line weight, and border color you would like.
  • Select the cells you want bordered.
  • Click the Outside Border button drop-down menu, and choose the location of your border.

Table Border Options

Adding shading

To apply shading:

  • Select or place the insertion point inside the cell(s) you want shaded.
  • Click the Shading Color button drop-down arrow. A shading color menu appears.
  • Click on a color. Your cell(s) are automatically shaded.

Table Shading Example

Did you know?

You can access many of the features from the Table and Borders dialog box on the task pane. Choose the Reveal Formatting Menu and look for the Table and Cell Headings.

Challenge!

  • Open your document.
  • Edit the text, if necessary. Ask yourself:
    • Is it the right font and size?
    • What direction do I want the text?
    • How do I want it aligned?
  • Delete any unnecessary rows or columns.
  • Add any needed rows or columns.
  • Resize the table if needed.
  • Modify the color and thickness of the lines if needed.
  • Apply shading to the table if needed.
  • Save and close the document.

/en/word2003/working-with-objects/content/