Money Basics: Managing a Checking Account

Lesson 8: Managing a Checking Account

/en/moneybasics/banking-options/content/
Managing a checking account

illustration of a debit card and a tablet showing a bank app

By the end of this lesson, you should be able to:

  • Explain how to open a checking account
  • Demonstrate how to write a check
  • Demonstrate how to fill out checking account deposit and withdrawal slips
  • Demonstrate how to use an automated teller machine (ATM)

What is a checking account?

Having a checking account at a bank or financial institution allows you to write checks to pay for goods and services or to get cash. A check is a written order instructing your bank to pay money to an individual or entity.

To use checks, you must first open a checking account and make regular deposits into that account. Banks offer several types of checking accounts. Here are some of the most common checking options:

  • A basic checking account is for someone who primarily wants to use checks to pay bills or everyday expenses. To avoid fees, some banks require a low minimum balance.
  • An interest-bearing account requires a higher balance, and interest is usually paid monthly. A minimum deposit is typically required to open this type of account.
  • A joint checking account is for two or more people who are typically in the same household.


Visit banks to learn more about the types of checking accounts they offer, and decide which one best fits your needs or the needs of your household.

Opening a checking account

Compare services at different banks before opening a checking account, and decide which account best meets your needs.
To open a checking account:

  1. Visit the financial institution of your choice, and speak to a customer service agent about opening a checking account.
  2. Bring with you:
    • Two forms of identification, including one with a picture
    • Your Social Security Number
    • Money for your first deposit in the form of cash or a check
  3. Be prepared to fill out information on a signature card that will remain on file at the bank. The bank uses the card to verify the signature on checks that bear your name. Signature cards typically include:
    • Your name
    • Your current address and length of time at the address
    • Your previous address and length of time at that address
    • The type of account, such as single or joint
    • Your signature
  4. Once your account is approved, you can make your first deposit.

Getting your checks

illustration of a check and a debit card

When you open a checking account, the bank will provide temporary checks until you order permanent ones. You can order checks from the bank or from a third-party provider. Plain checks are generally less expensive than those with fancy designs.

You may have various styles of checks from which to choose. For example, some checkbooks come with a duplicate feature. This allows you to keep a carbon copy of the checks you write for your records.

The box(es) of checks you order will be sent to you in the mail. Several checkbooks, or groups of checks, are in each box.

Your checking account number—the number your bank assigns to your checking account—and your bank's routing number appear on your checks. Your checking account number is important as you make deposits to and withdrawals from your account. The routing number simply identifies your bank.

Writing a check

Checks are convenient when you don't want to carry around a lot of cash or when you need to pay bills through the mail. Take a few minutes to review the parts of a check:
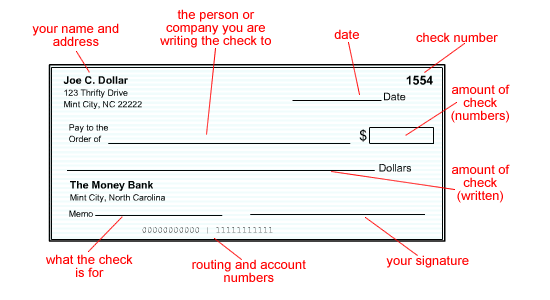
check with parts labeled

To write a check:

  1. Enter the date at the top of the check.
  2. Write the name of the company or person you are paying money to in the Pay to the Order of line.
  3. At the end of the Pay to the Order of line, write the number amount of the check (for example, $25 or $48.28).
  4. On the dollars line, write the check amount in words. This confirms the number amount (for example, forty-eight dollars and 28/100). Note that you can write the cents as a fraction.
  5. If there is blank space left after you write in the amount, draw a line out to the end—stopping before the word "dollars"—so no one can add to the amount (for example, forty-eight dollars and 28/100-----------------------dollars).
  6. Write your signature on the line at the lower-right corner of your check.
  7. In the Memo or For section in the bottom-left corner, write what the check is for (for example, "jeans for John" or "rent").

Print out a blank printable check and practice filling it out.

Deposit slips

A deposit slip is a written order to your bank instructing it to put funds into your account. You can use a deposit slip to put money such as cash, checks, and money orders into your account.

Be sure to endorse or sign any check that had been made payable to you before you deposit it. On the back of the check, there is a place for your endorsement, or signature.

Deposit slips vary from bank to bank. Here's an example:
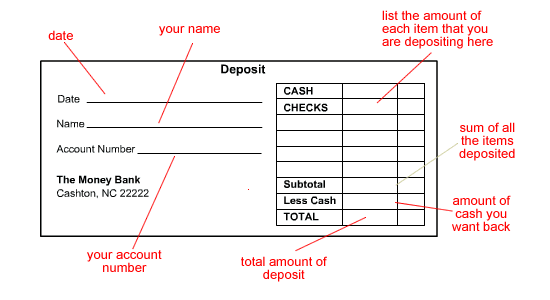
deposit slip with parts labeled

To fill out a deposit slip:

  1. List the amount of money you want to deposit. Most slips have separate lines for cash and checks.
  2. For example, add $30 (cash) and $450.55 (check).
  3. Enter the subtotal. In this case, it's $480.55.
  4. Enter any amount you want back. In this case, it's 0.
  5. Enter the Total. In this case, it's $480.55.
  6. Sign the deposit slip.
  7. Take the slip and the money you want to deposit to a teller at your bank. You also can make deposits using an ATM if you have an ATM card. You'll learn about using an ATM later in this lesson.

Print out a printable deposit slip to practice filling it in by hand.

If you want to cash a check and not deposit it, remember to sign the back of the check.

Visit Deposit in our Everyday Life section to practice endorsing a check and filling out a deposit slip.

Withdrawal slips

A withdrawal slip is a written order to your bank instructing it to withdraw funds from your account. Withdrawal slips vary from bank to bank.

Here's an example:
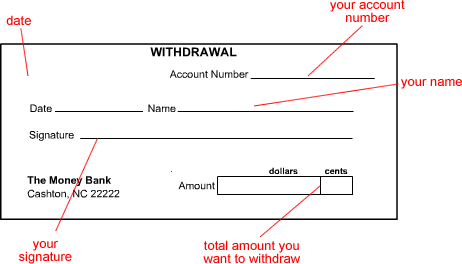
check with parts labeled

To fill out a withdrawal slip:

  1. List the amount of money you want to withdraw (for example, $50).
  2. Sign the withdrawal slip.
  3. Take the slip a teller at your bank, or withdraw money using an ATM.

Print out a to printable withdrawal slip to practice filling it in by hand.

Keeping track of your account

As you write checks or make deposits, keep track of the amount of money remaining in your account. Your bank or financial institution will send you a monthly statement or list of the various withdrawals and deposits made on your account. If you have an ATM card, you can also access this type of information at an ATM. You can also access your account status at any time if you bank online.

To keep a current record of your checking account, use your check register. This tool usually comes with your checkbook.

When your bank statement arrives, compare it with your check register. Balance or reconcile your account by figuring out the amount of money you deposited, the amount you spent, and the amount you have left. Basic accounting software such as Quicken can also help you balance your checkbook.

Avoid writing bad checks

Don't write checks if you don't have enough money in your account. The consequences can be damaging.

  • Your bank and the business you wrote the check to may each charge you a fee of about $25.
  • You may be placed on a bad check list, and businesses may refuse to accept your checks.
  • Your bank may close your account, and other banks may be alerted.
  • You could face criminal charges if authorities can prove criminal intent.

Automated teller machines and ATM cards

An ATM card looks like a credit card. Because it is linked to your bank account(s), you can use it to get cash, deposit funds, and check account balances at an automated teller machine (ATM). ATMs are convenient because they are available 24 hours a day at different locations.

A debit card combines the functions of an ATM card and a check. It can be used like a check. Most banks issue a combination ATM/debit card. Aside from an ATM card or debit card, you can also use a credit card—which is linked to your credit card account—at an ATM.

To use an ATM, you need a personal identification number (PIN). A bank or financial institution issues this four-digit number to you to protect against anyone else using your card. You must have a PIN and password to access online banking services. Always safeguard such information.

Visit ATM in our Everyday Life section to practice using an ATM.
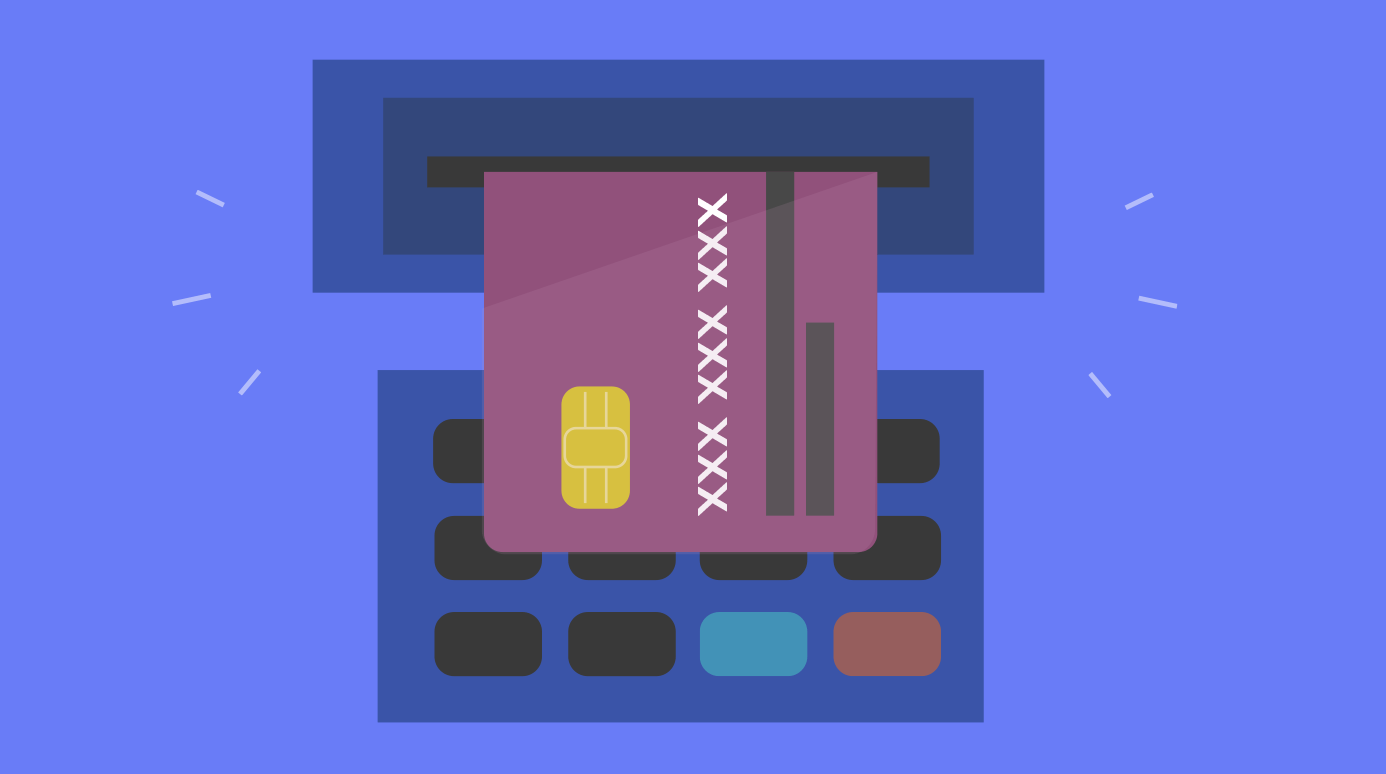
Operating an ATM

illustration of an ATM card being inserted into an ATM

ATMs may differ in appearance. However, they operate in the same basic way.

To use an ATM:

  • Insert your ATM, debit card, or credit card into a slot on the machine.
  • You may be asked to select English or Spanish.
  • Using the machine's number keypad, Enter your PIN.
  • Press Enter.
  • Select your transaction—for example, Withdrawal, Deposit, Transfer Funds, or Account Balance.
  • Another list of choices appears based on your transaction. For example, you may need to select which account you want to withdraw or deposit funds to, or which account you want to transfer money from and which one you want to transfer money to.
  • You will also need to select or enter the amount of money you want to withdraw or deposit. If you are making a deposit, you will have to put the amount into a deposit envelope and insert it into a slot on the machine.
  • Your transaction will be processed. For example, if you made a withdrawal the machine will issue you cash.
  • Your card will be returned to you, and a receipt will be printed if you requested one. Don't forget your card!

Online

Offline

  • The Complete Idiot's Guide to Managing Your Money (3rd Edition) - Robert K. Heady and Christy Heady
  • Checkbook Management - A Guide to Saving Money - Eric Gelb

/en/moneybasics/managing-a-savings-account/content/