OS X Mountain Lion -
Communication

OS X Mountain Lion
Communication


/en/macosxmountainlion/syncing-with-icloud/content/
There are thousands of apps available for the Mac—both in the App Store and built into your computer. If you're just getting started, however, there are a few that are absolutely essential. This includes:
These are the apps that will help you communicate on your computer so you can keep in touch with friends, family, and other contacts. The great thing about them is the fact that they're available for other Apple devices too—including the iPad, iPhone, and iPod Touch.
There are many benefits to using these apps if you have more than one Apple device. They're designed specifically so you can open the same app anywhere (on your iPad, iPhone, iPod Touch, or Mac) and still experience the same look, feel, and functionality. All of your information will be there too, including your contacts, email, and messaging history.
We'll be using the iPad for most of the demonstrations in this lesson, but if you have another device, don't worry. The corresponding apps for the iPhone, iPod Touch, and Mac are fairly similar. The important thing is that you get to know some of the basic tools and features and come away with a solid understanding of what each app can do. Then you can explore the apps some more on your own.
Contacts may be one of the most important apps on your device—not just because it contains so much important information (including valuable names, phone numbers, and more) but also because it's heavily integrated with so many other apps.
For example, it's what makes instant messaging so efficient. All you have to do is open the Messages app, and if a contact is saved to your list you can start a chat instantly. The same goes for Mail. You can email anyone you know in seconds.
In short, even if you don't think you'll use the app itself very much, your device will use the information it contains all the time. That's why it's important to understand what Contacts is, because it has so much potential to improve your experience with apps.
Click the arrows to view Contacts on each device.
If you have Mac with OS X Lion or earlier, the app will be called Address Book instead.

Use iCloud to sync the Contacts app. To find out if you already have it enabled, visit your device's iCloud settings. Remember, you have to configure each device separately.
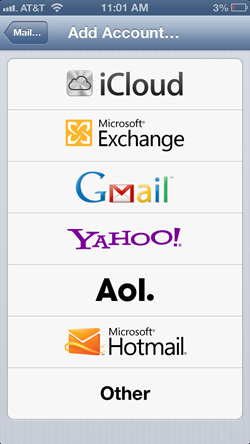 Importing from another service
For many people, importing contacts from another device or service—technically a form of syncing—happens along the way. However, your options will vary depending on the type of device you have.
If you purchased an iPhone at a retail store, the sales associate probably set up your device as a courtesy to you. If this didn't happen, you may need to go back and ask someone at the store to transfer the contents of your SIM card. You can do this with an iPad too if you have one of the cellular models.
There are also certain mobile apps that allow you to sync or import your contacts from another service. For example, when you sign in to Mail for the first time you should have the option of syncing the contacts that are stored in your email account. This will add them to the Contacts app.
As a last resort, you may need to input some or all of your contacts manually—especially if your only Apple device is a Mac. However, once this step is complete, your contacts will be much easier to sync/import in the future. You'll be able to sync the app to iCloud so you can access your contacts on any other Apple device. This is especially useful if you upgrade to a newer Apple device in the future.
As you already know, the Contacts app is different on each device, but there are many similarities when it comes to basic tools and features. Use the interactive below to learn how to perform several common tasks in the iPad version.

Tap + to create a new contact. You can add all kinds of information, including the person's name, phone number, and email address—even a customized ringtone.

Tap Send Message to interact with the contact—either by phone, email, or the Messages app, depending on your device.

Tap Add to Favorites to add the person's contact information to your "favorites."
This will make it easier to find and communicate with them in certain apps (for example, FaceTime, or the calling area on the iPhone).

Tap Share Contact to forward the contact's information via email or text message.

Tap FaceTime to start a video chat, then choose the phone number or email you want to use.

The contact card is where you'll be able to view and edit each contact's information.
If the card contains a lot of information, you may need to scroll up and down to view it (and access the communication options at the bottom).
To view one of your contacts, tap their name. Their contact card will open on the right, where you can perform several different tasks.
Use the search feature to search for contacts by first or last name.

Tap a letter to quickly jump to a new location in your contacts list.
Tap Edit to edit the contact's information. This is also where you can delete the contact if you want to remove them from your list.


Once you know your way around the app, consider these tips for getting the most out of Contacts.
To select a contact when using another app, tap the ![]() button. Then select the person's name from the list. Alternatively, you can start typing any information from that person's contact card (for example, name, email address, or phone number), and your device will pull up that contact automatically.
button. Then select the person's name from the list. Alternatively, you can start typing any information from that person's contact card (for example, name, email address, or phone number), and your device will pull up that contact automatically.
This technique works in Mail, Messages, and any other app that allows you to use your Contacts list.
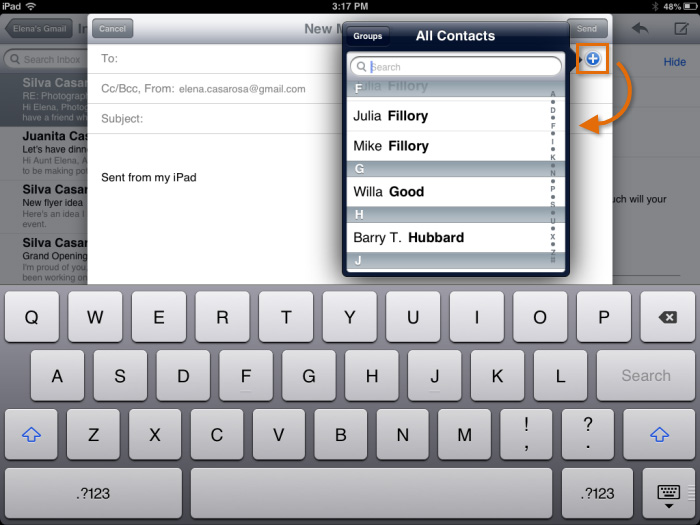 Selecting a contact
To add someone to Contacts from inside another app, simply tap that person's name or contact information. You'll be able to add the person as a new contact or add his or her information to an existing contact. The latter is useful if the person has more than one email address or phone number.
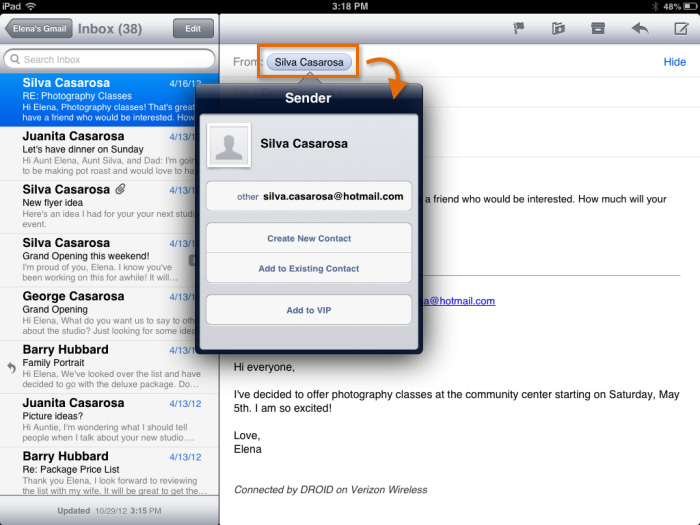 Adding to contacts
Need to add several new contacts at once? It might be easier to do it on your computer if you have a Mac. Many people prefer their Macs for tasks that require a lot of typing simply because there's access to a full-sized keyboard.
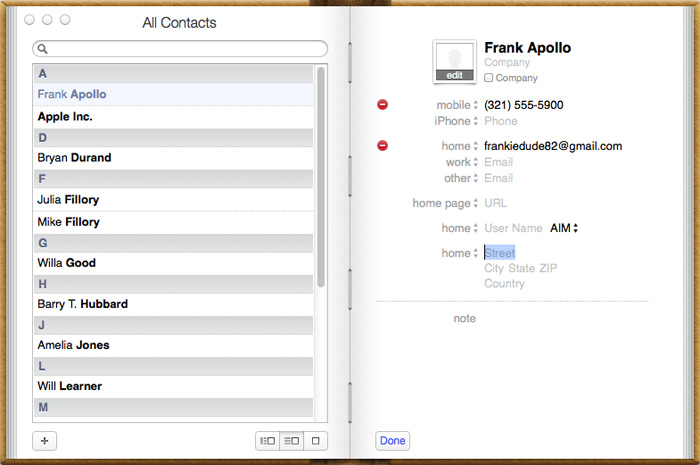 Contacts for Mac
Mail is probably one of the first apps you'll want to set up on your device. You can use it to catch up on email, reply to messages, and manage your inbox—all the things you're used to doing with your email account, except the app makes it much more convenient.
Mail is compatible with Gmail, Hotmail, and most other popular services. You can even add more than one account to the app, like your personal email or work email. This way, you can check all of your email in one convenient place.
Click the arrows to view Mail on each device.

Most people will sync their email simply by signing in to the same account on each device. This solution isn't as high-tech as syncing with iCloud, but it works exactly the same way. You can sync Mail with iCloud only if you have an @icloud.com email address.
Setting up Mail is easy; however, your experience will vary depending on the type of email account you have and the device you're currently using. In the example below, we'll show you how to set up the app on an iPad.
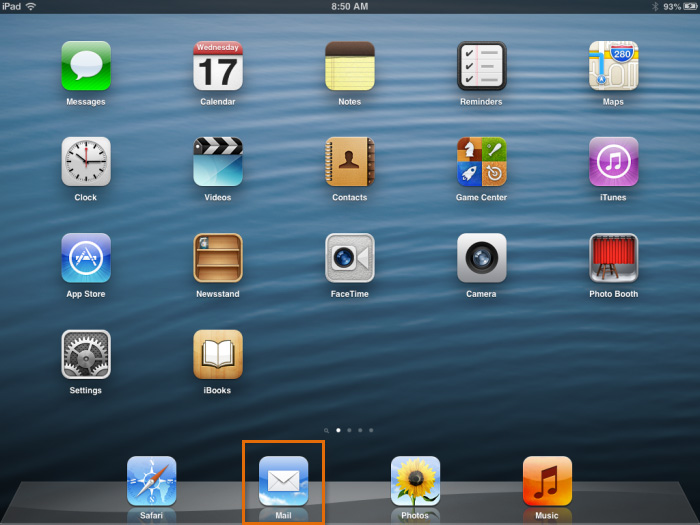 Opening the Mail app
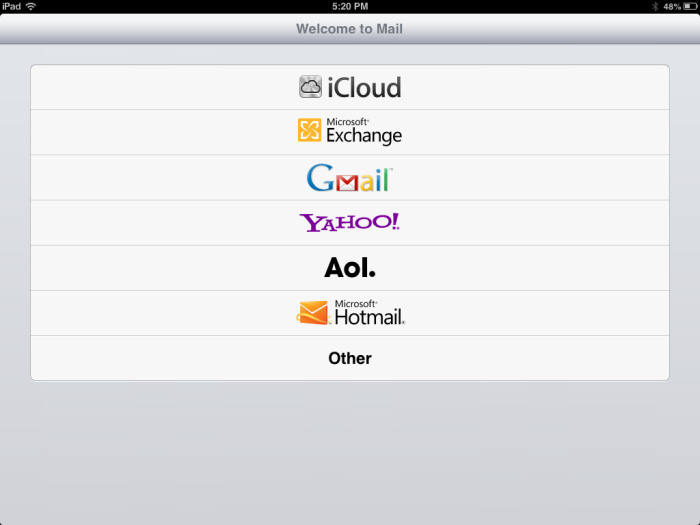 Selecting your email service
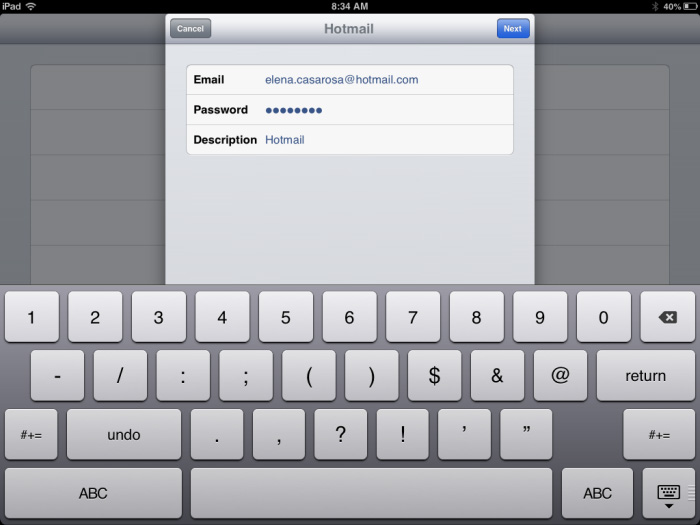 Entering your account information
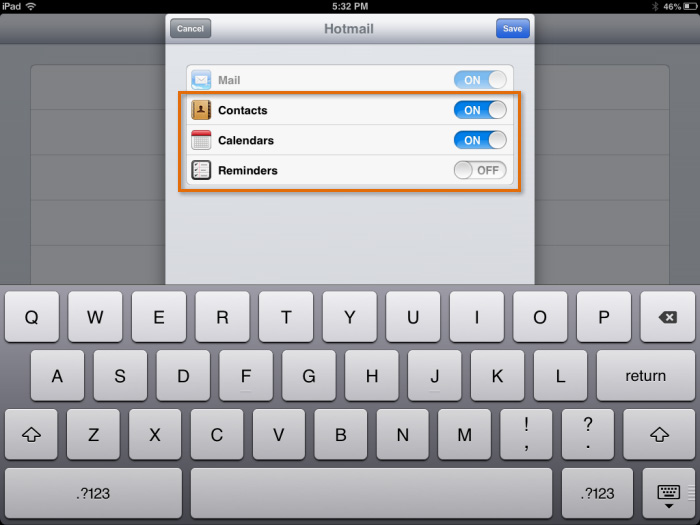 Syncing other services
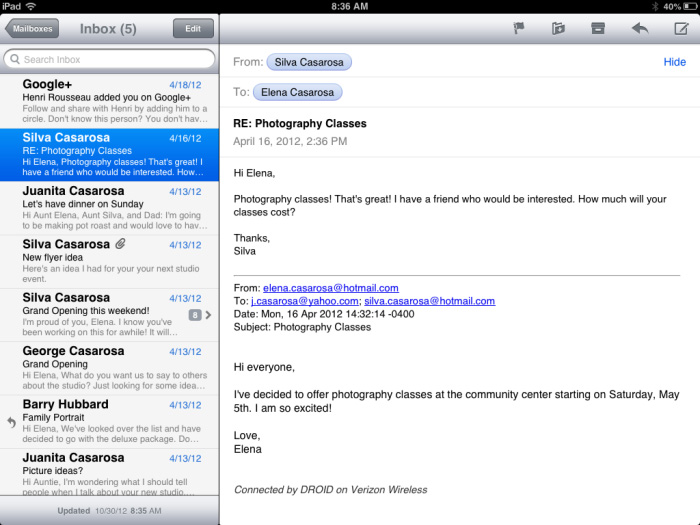 The Mail app
As you already know, the Mail app is different on each device—but there are many similarities when it comes to basic tools and features. Use the interactive below to learn how to perform several common tasks in the iPad version.

Tap Edit to quickly manage all of your messages at once. From here, you can Archive, Delete, or Move multiple messages, so you don't have to manage them one at a time.
Tap this icon to compose a new message. The new message screen and the keyboard will open automatically.
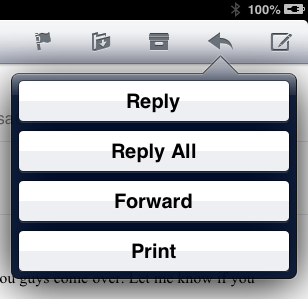
Use the arrow icon to reply or forward the current message. You can even print the message if your device is connected to a printer.
To delete the current message, use this icon. If your email service supports archiving, the Mail app will default to archiving instead.
Here, you can move the current message to another folder.
Use the this icon to flag the current message as spam, or mark it as unread.

To read one of your messages, tap it in the left pane. It will open on the right, where you can access several other options (including delete, reply, and more).
If your inbox is particularly full, you may need to scroll up and down in the left pane to view all of your messages.
Use the Search feature to search the entire contents of your email. This is useful if you're looking for a specific message, and you can't find it. Just enter your search terms in the box, and the app will list the results below.
You can confine your search to a specific area (From, To, or Subject), or search through everything (All).
Use the Mailboxes button to access different parts of your email account. For example, you can navigate to Drafts, Trash, and other folders that you've created.
This is also where you can navigate between different accounts (for instance, work and home), if you have more than one email address set up in the app.

Once you know your way around the app, consider these tips for getting the most out of Mail.
If you receive a new message and you don't currently have the app open, your device can notify you in several different ways depending on your settings. By default, you should see at least the badge app icon whenever you have a new message waiting.
Visit the app's settings to customize your notifications or set up even more alerts.
 New messages
If you have more than one email account—for example, one for personal use and one for work—you can add them both to the Mail app. This will make it possible for you to access all of your email in one convenient place, even if they're from completely different services.
To get started, navigate to Mail, Contacts, and Calendars in your device's settings, then choose Add Account. Follow the instructions to enter your information, and your second email account will be synced. You can add as many additional accounts as you want.
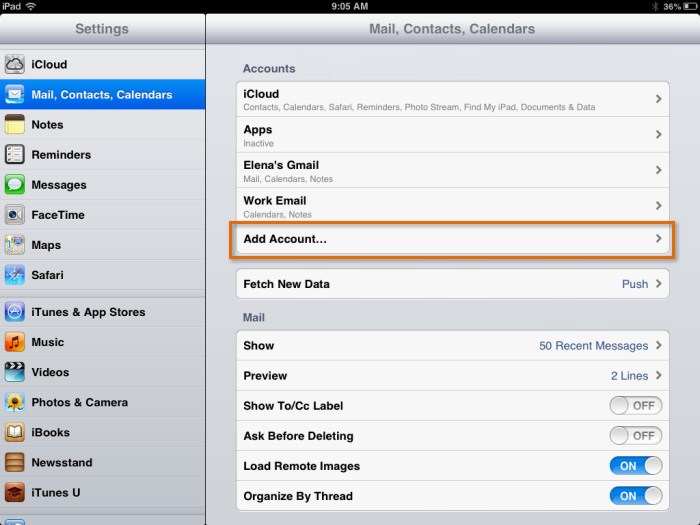 Adding another account
Why type your emails when your device can do it for you? If you have an iPad, iPhone, or iPod Touch with Siri enabled, you can use voice dictation to compose emails instead of relying on the keyboard. This can be especially useful if you need to type a long email in a hurry.
To use voice dictation in the Mail app, tap the microphone icon on your keyboard. Then say your message out loud, and Siri will try to transcribe it for you.
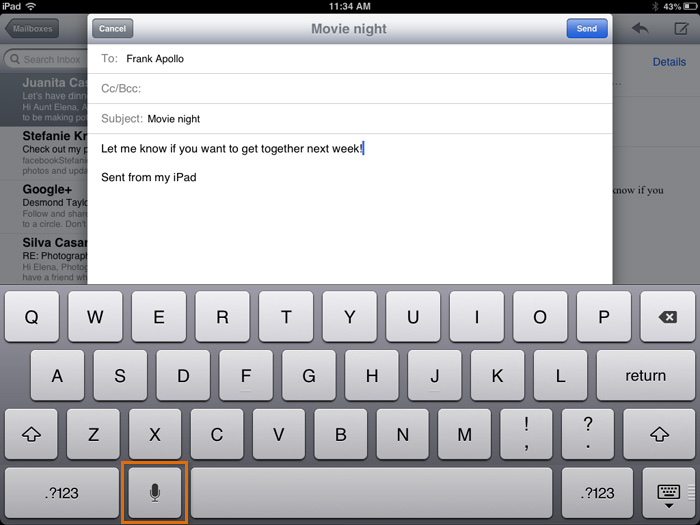 Voice dictation in Mail
Alternatively, you can ask Siri to perform the entire task for you from start to finish. For example, you could say, "Email Frank. Let me know if you want to get together next week." Siri will not only transcribe your message, but it will also use the Mail app to send it—all without any extra effort from you.
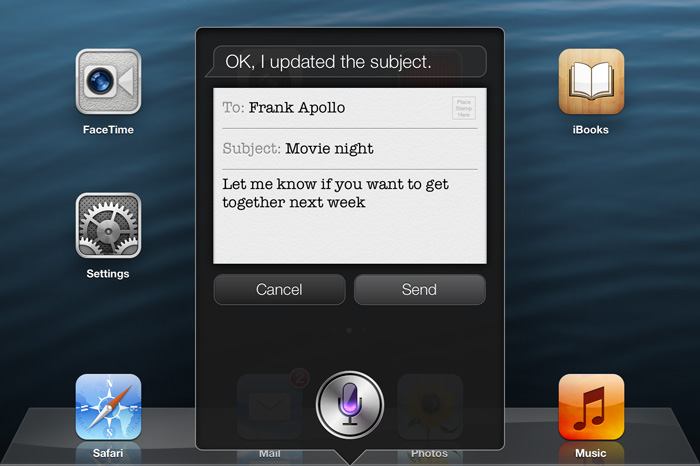 Using Siri to send an email
The Messages app does a bit more than your average instant messaging service. With its built-in iMessage feature, you can use it to send unlimited texts, photos, videos, and more to other Apple users—all for free. It's even free for mobile devices, as long as you stick to Wi-Fi instead of data.
If you have more than one Apple device, Messages is great for texting and chatting no matter where you are. For example, the mobile version is perfect for sending quick messages, while the desktop version is ideal for having longer conversations (when you have access to a full-sized keyboard).
Click the arrows to view Messages on each device.
Messages for Mac was introduced with OS X Mountain Lion. If you have OS X Lion or earlier, the app is not available for your computer.

Use your Apple ID to sync the Messages app. Just sign in to the app using the same Apple ID on each device, and you'll be able to send and receive messages anywhere. If you have an iPhone, your Apple ID should be connected to your device already.
It's important to note that the iPhone version of the app is a little different from the others. That's because it does double duty—both as your iMessage client and as your regular text messaging client. In other words, it's the same app you'll use anytime you want to text someone, whether that person has an Apple device or another type of phone (such as Android, Windows, or a basic cell phone).
The app will default to iMessage—and the conversation will be blue—if the person on the other end has an Apple device. If not, the conversation will be green, and the message will be sent as a regular text.
 iMessage
 Text message
Check your cell phone plan to find out if text and data charges apply. Texts sent via iMessage won't count toward your limit, but regular texts will.
Setting up the Messages app is fairly straightforward (in fact, on the iPhone it should be set up already). In this example, we'll demonstrate the process using the Mac version.
 Opening the Messages app
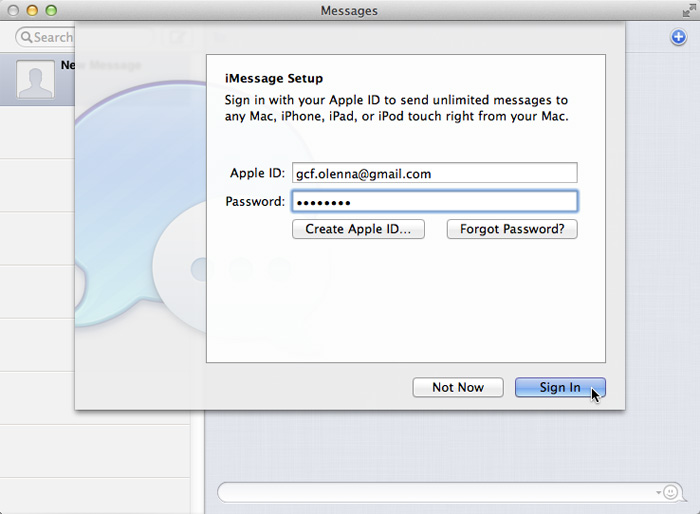 Entering your Apple ID
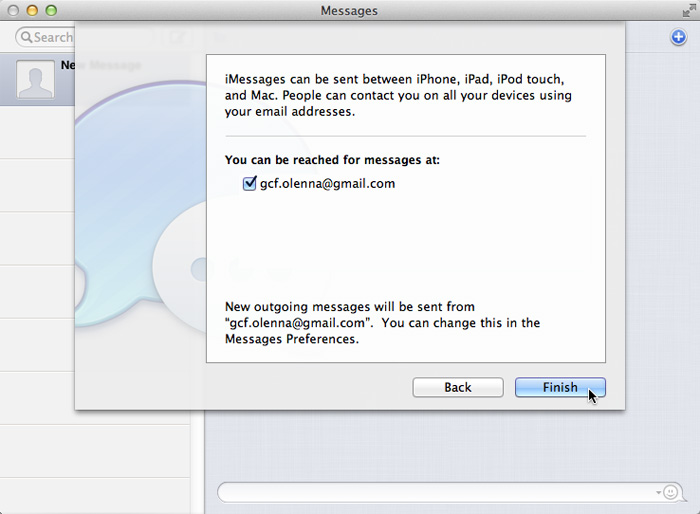 Continuing to the app
 The Messages app
As you already know, the Messages app is different on each device—but there are many similarities when it comes to basic tools and features. Use the interactive below to learn how to perform several common tasks in the iPhone version.

Tap here to compose a new message. The new message screen and the keyboard will open automatically.
Here you can view all of your messages, arranged from newest to oldest. Messages are organized into "conversations" between you and your friends, so it's easy to pick up where you left off, or reference an old text.
To view or resume a conversation, just tap the one you want.

Use the Search feature to search all your past conversations. Just enter your search terms in the box, and the app will list the results below.
Use the Edit button to delete an entire conversation. This will delete all the texts you've sent and received from this person to date.
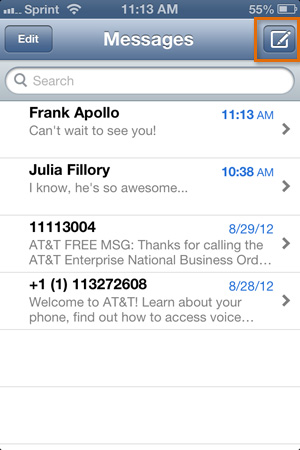 Creating a new message
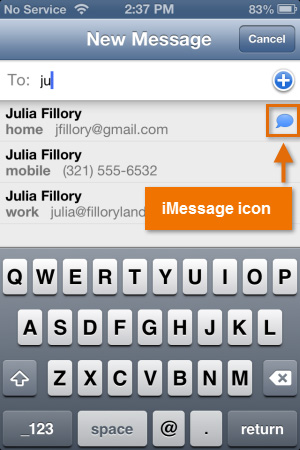 Selecting a contact
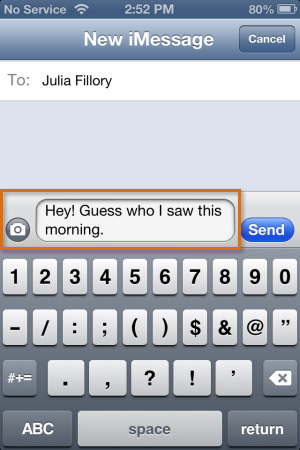 Composing a message
 Sent message
You can also send group messages using the Messages app. Just type additional names in the To field, or use ![]() to manually select more than one contact. Keep in mind: if you have an iPhone and you include anyone who doesn't have an Apple device, it will change the message to a regular text.
to manually select more than one contact. Keep in mind: if you have an iPhone and you include anyone who doesn't have an Apple device, it will change the message to a regular text.
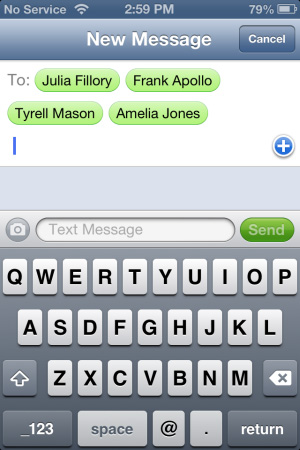 Group message
Once you know your way around the app, consider these tips for getting the most out of Messages.
If you receive a new message and you don't currently have the app open, your device can notify you in several different ways depending on your settings. By default, you should receive an alert, the badge app icon, and an item in the Notification Center. Visit the app's settings to change your notifications or customize the way they behave.
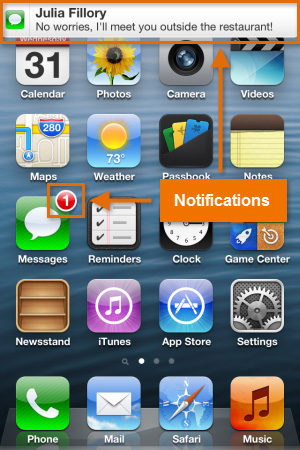 Message notifications
If you want, you can enable read receipts on your device so your contacts can tell when you've read their messages. Read receipts may be difficult to understand at first because they don't appear on your device at all (in fact, it can be difficult to tell if they're enabled). They appear on your friends' devices instead so they can tell exactly when you've read their texts. See below for a comparison.
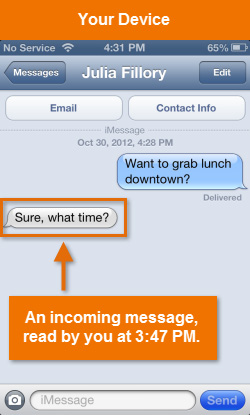 Message on your device
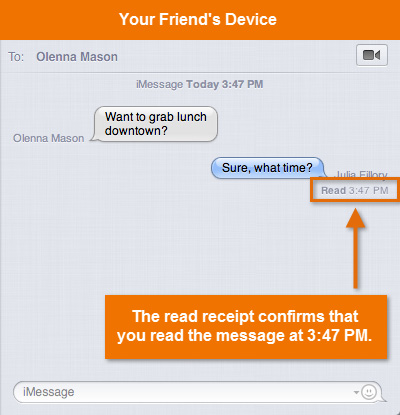 Read receipt on your friend's device
Read receipts can be convenient, but some people aren't comfortable with this level of transparency. To enable or disable read receipts on your device, go to the app's settings. Read receipts should be disabled by default unless you chose to enable them when prompted by a pop-up (this sometimes happens during setup, or after you've used the Messages app a few times).
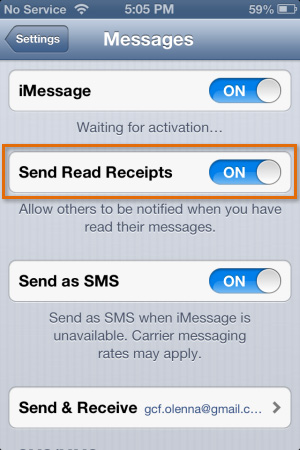 Messages settings
If you have an iPad, iPhone, or iPod Touch with Siri enabled, you can use voice dictation to compose texts instead of relying on the keyboard. This can be especially useful if you're in a hurry and need to send a quick message to a friend.
To use voice dictation in the Messages app, tap the microphone icon on your keyboard. Then say your message out loud, and Siri will try to transcribe it for you. You can repeat this technique over and over throughout the conversation.
 Voice dictation in Messages
Alternatively, you can ask Siri to perform the entire task for you from start to finish. For example, you could say, "Text Julia. Sorry I'm running late, I'll be right there." Siri will not only transcribe your text, but it will also use the Messages app to send it—all without any extra effort from you.
 Using Siri to send a text
FaceTime allows you to make free video calls to other Apple devices. All the other person needs is a device of his or her own (iPad, iPhone, iPod Touch, and most Mac computers are compatible). If you have an iPad or iPhone, you can even take advantage of your device's front and back camera. For example, you could use the front camera to talk face to face, then switch to the back camera to show what's going on around you.
If you haven't already added your friends and family to your contacts, now's a good time to do that. You can't call people in FaceTime just by dialing their numbers or entering their email addresses. They have to be part of your contacts list first.
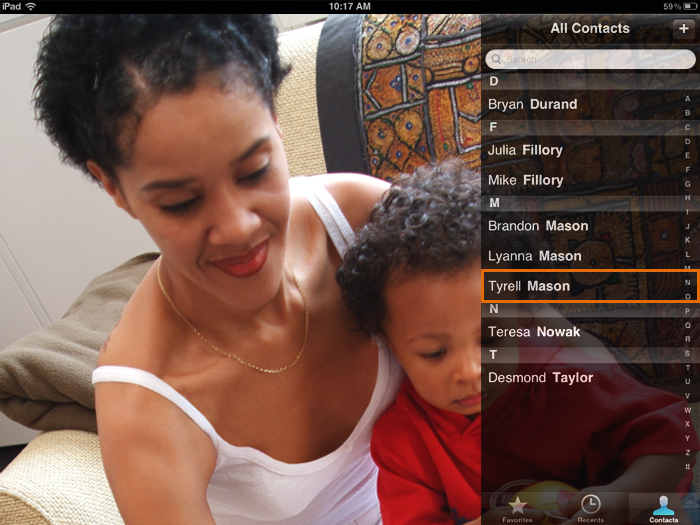 The FaceTime app
If you have the newest version of the iPad or iPhone, it's helpful to know that you can make FaceTime calls over your cellular network if Wi-Fi isn't available. However, to avoid exceeding your data allowance we recommend using FaceTime over Wi-Fi whenever possible.
Find My Friends can be downloaded for free in the App Store. Developed by Apple, this app is designed to work closely with Contacts, Maps, and all the information synced in your iCloud account. It can help you keep track of friends and family, pinpoint their current location, and more. You can even receive alerts about their whereabouts, like when they leave or arrive at a specific location.
Find My Friends only works if your friends use the app too. If you don't want your location to be visible, you can always hide it temporarily or turn it off permanently.
Find My Friends is available for the iPad, iPhone, and iPod Touch only.
Twitter and Facebook have their own mobile apps for the iPad, iPhone, and iPod Touch. You don't even have to go looking for them in the App Store—instead, you'll find everything you need under your device's Settings. Just navigate to each app, then click Install to get started. Once the installation is finished, the app will walk you through the process of setting it up.
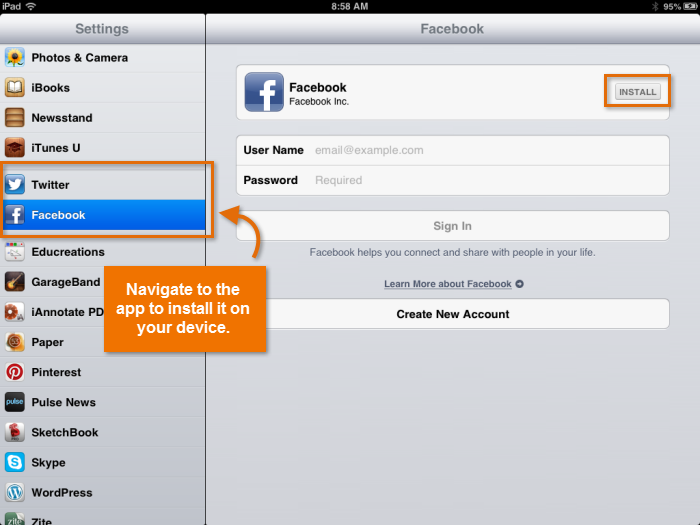 Installing Twitter and Facebook
Both Twitter and Facebook are designed to integrate with Contacts so you can keep in touch with the people you know even more easily. This means your device may download additional data from your social networking accounts, including more contact information for your friends or their profile pictures. The results will vary depending on your settings.
Other mobile apps from third-party developers (i.e., apps that are supported by Apple but not developed by Apple) can be downloaded in the App Store. There, you'll find a variety of tools that can help you communicate with friends and family and keep up with your social networks. These include:
Remember, the App Store is filled with thousands of choices. If you have something particular in mind (maybe an app for your favorite service), just search for it. There's a good chance you'll find what you're looking for.
/en/macosxmountainlion/everyday-tasks/content/