Basic HTML -
Interactive Elements in HTML

Basic HTML
Interactive Elements in HTML


/en/basic-html/links-and-images-in-html/content/
This lesson is part of a series on computer programming. You can go to Intro to Programming if you'd like to start at the beginning.
Once you've added text, links, and images, you've got most of the basic pieces you're likely see in the websites you visit every day. However, the last essential components are interactive elements. Any time you put a username and password into a login field, or press a button to open a menu, or click a checkbox on a settings page, you're dealing with interactive elements such as buttons and inputs.
The HTML element for a button is exactly what you might guess:
<button>Press me</button>
It might feel more complicated than that because you see so many different types of buttons, and they often look radically different from one another. However, the vast majority of those looks are accomplished with CSS, which we will cover later; the underlying HTML is usually no more complicated than what you see above. All of these buttons, for example, are built from that same HTML:
The text inside the button element is what will be displayed on the button, but it can also contain image elements instead. For example, a common type of button you see on many websites (this one included) is called a hamburger button, named because the image it uses resembles a hamburger. The HTML might look like this:
<button>
  <img src="https://media.gcflearnfree.org/global/coding/hamburger-button.png">
</button>
In the browser, it would be displayed like this:
With some CSS added to hide some of the default button appearance, it can look completely different from the buttons you've seen so far:
Other than links, most of the things you click on a webpage to make something happen are probably button elements, even if they look extremely different from one another.
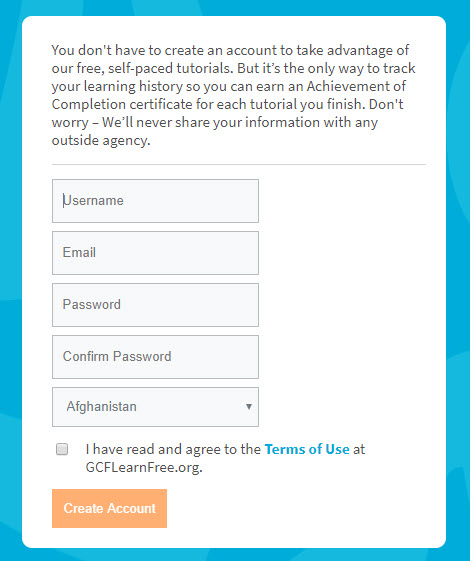
The other most common way you've probably interacted with websites is through inputs. At some point, you've probably been asked to enter a username and password for a website. Maybe there was a checkbox that asked if you had read a Terms of Service page, or something along those lines, and maybe a drop-down menu that asks you to choose an option from many. If you've ever created an account on this website, for example, you've seen and used all three:

Each of these options is a type of HTML input. For example, these are the elements for a text input (like the ones you type a username or password into) and a checkbox input:
<input type="text">
<input type="checkbox">
Notice that they actually use the same HTML element, <input>, with different HTML attribute values. Those values give the browser enough information to display two completely different things when loaded:
A drop-down input, on the other hand, is made using a select element, which contains a number of option elements. The HTML would look like something like this:
<select>
  <option>The First Option</option>
  <option>Another One</option>
  <option>Bunch of Options Here</option>
</select>
This element is structured similarly to the <ol> and <ul> elements you used to make lists. That's because the <select> element itself isn't displayed; instead, it acts as instructions to tell the browser how to display the <option> elements nested inside. If you were to display the HTML above in the browser, you'd see this:
Try typing each of the previous code samples into the input below. If you click the "Add our CSS" checkbox, you'll find that some of these look completely different from browser defaults on our site, while others are unchanged.
You can enter them all together if you want, but it may be easier to see what's going on if you enter them one at a time:
All of these HTML elements are interactive without adding anything to them—you can click them, type text into them, select them, and so on—but HTML alone can't make any of those interactions actually accomplish anything useful. We won't go into detail on either of these methods yet, but two major tools for doing things with these interactions are HTML forms and JavaScript.
Open the index.html file of your GCF Programming Tutorials project in your text editor, and let's add an interactive element. This one should be fairly straightforward because all you're going to add is a button.
<p>Find the full cast listing at the <a href="https://edu.gcfglobal.org">Basketball Dog</a> website.</p>
<button>Show Next Review</button>
For now, this button won't do anything, but eventually it's going to let you cycle through multiple movie reviews that you'll set up. Once you've added your button, your full code should look like this:
<html>
  <body>
    <h1>Cinema Classics Movie Reviews</h1>
    <h2>Review: Basketball Dog (2018)</h2>
    <img src="https://media.gcflearnfree.org/global/coding/basketballdog.png">
    <p><i>4 out of 5 stars</i>
    <p>From director <b>Vicki Fleming</b> comes the heartwarming tale of a boy named Pete (Trent Dugson) and his dog Rover (voiced by Brinson Lumblebrunt). You may think a boy and his dog learning the true value of friendship sounds familiar, but a big twist sets this flick apart: Rover plays basketball, and he's doggone good at it.</p>
    <p>This movie has everything you could ask for:</p>
    <ul>
      <li>Basketball</li>
      <li>A dog</li>
      <li>Nail-biting suspense</li>
    </ul>
    <p>While it may not have been necessary to include all 150 minutes of Rover's championship game in real time, Basketball Dog will keep your interest for the entirety of its 4-hour runtime, and the end will have any dog lover in tears. If you love basketball or sports pets, this is the movie for you.</p>
    <p>Find the full cast listing at the <a href="https://edu.gcfglobal.org">Basketball Dog</a> website.</p>
    <button>Show Next Review</button>
  </body>
</html>
Open the File Explorer or Finder and navigate to your GCF Programming Tutorials project, then double-click your index.html file. Your webpage should open in your default browser, and you should see something like this.
Congratulations, you've got something to click!
/en/basic-html/blocklevel-inline-and-organizational-elements/content/